Jul 31, 2024
Managing and monitoring Microsoft 365 license allocations– Planning and Managing Azure AD Identities

If identity is the foundation for security in the Microsoft 365 platform, licensing is the entitlement engine that is used to grant identities access to the tools and applications.

Every Microsoft 365 service is tied to a license—whether that’s individual product licenses for Exchange Online or SharePoint Online or bundled offerings such as Microsoft 365 E3, which include multiple services.

In Microsoft terminology, there are a number of key terms to be aware of:

  • Licensing plans: In broad terms, a licensing plan is any purchased licensing item. For example, standalone Exchange Online P2 and Microsoft 365 E3 are both examples of licensing plans.
  • Services: Also known as service plans, these are the individual services that exist inside of a licensing plan. For example, Exchange Online P2 has a single Exchange Online P2 service plan, while Microsoft 365 E3 has an Exchange Online service plan, a Microsoft 365 Apps service plan, a SharePoint Online service plan, and so on.
  • Licenses: This is the actual number of individual license plans of a particular type that you have purchased. For example, If you have 5 subscriptions to Exchange Online P2 and 5 subscriptions to Microsoft 365 E3, you have 10 licenses (or 5 each of Exchange Online P2 and Microsoft 365 E3). Licenses are frequently mapped 1:1 with users or service principals, though some users may have more than one license plan associated with them.
  • SkuPartNumber: When reviewing licensing in PowerShell, the SkuPartNumber is the keyword that maps to a licensing plan. For example, Office 365 E3 is represented by the ENTERPRISEPACK SkuPartNumber.
  • AccountSkuId: The AccountSkuId is the combination of your tenant name (such as Contoso) and the SkuPartNumber or licensing plan. For example, the Office 365 E3 licensing plan belonging to the contoso.onmicrosoft.com tenant has an AccountSkuId of contoso:ENTERPRISEPACK.
  • ConsumedUnits: Consumed units represent the number of items in a licensing plan that you have assigned to users. For example, if you have assigned a Microsoft 365 E3 licensing plan to three users, you have three ConsumedUnits of the Microsoft 365 E3 licensing plan. If reviewing licensing from the Azure AD portal, this field is sometimes displayed as Assigned.
  • ActiveUnits: Number of units that you have purchased for a particular licensing plan. If reviewing licensing from the Azure AD portal, this field is sometimes displayed as Total.
  • WarningUnits: Number of units that you haven’t renewed purchasing for in a particular license plan. These units will be expired after the 30-day grace period. If reviewing licensing in the Azure AD portal, this field is also sometimes displayed as Expiring soon.

You can easily view purchased licensing plan details in the Microsoft 365 admin center under Billing | Licenses:

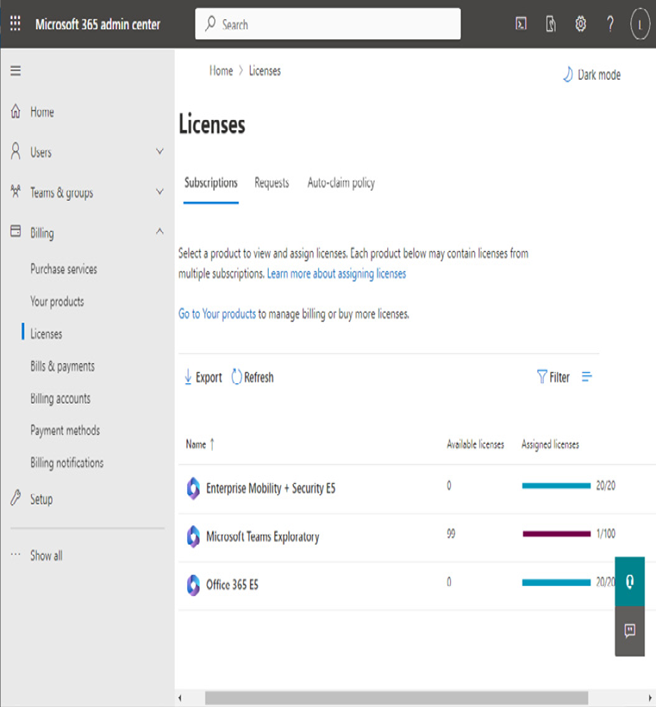
Figure 5.22 – License details in the Microsoft 365 admin center

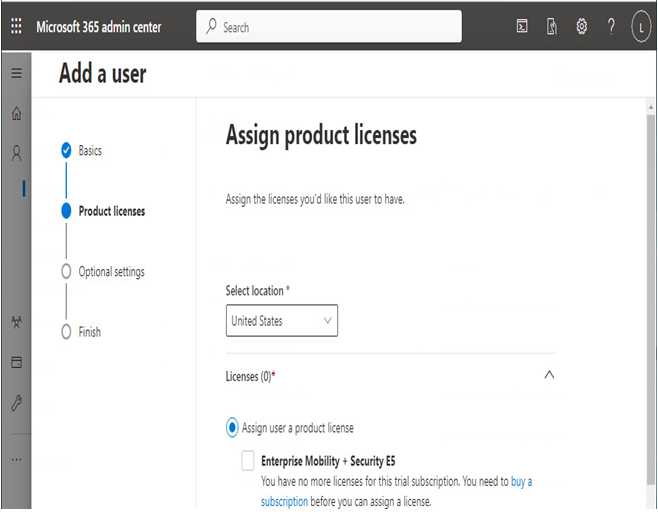
You can assign licenses in many ways:

  • Through the Licenses page in the Microsoft 365 admin center (Microsoft 365 admin center | Billing | Licenses)
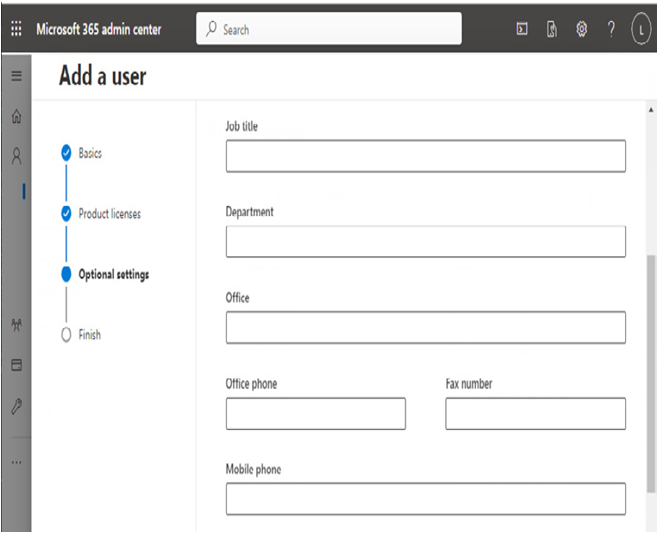
  • In the properties of a user on the Active users page in the Microsoft 365 admin center (Microsoft 365 admin center | Users | Active Users | User properties)
  • To users through the Licenses page in the Azure AD portal (Azure AD Portal | Azure AD | Licenses | Licensed users)
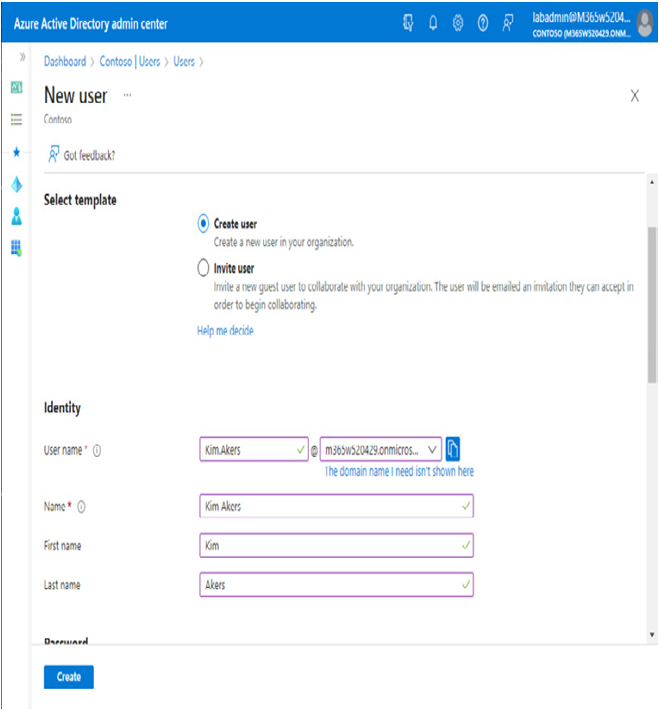
  • To users through the User properties page in the Azure AD portal (Azure AD Portal | Azure AD | Users | User properties)
  • To groups through group-based licensing (Azure AD Portal | Azure AD | Licenses | Licensed groups)
  • Through PowerShell cmdlets such as Set-MsolUserLicense

Each licensing method provides you with similar options for assigning license plans to users, including assigning multiple license plans or selectively enabling service plans inside an individual license plan.

For example, in the Microsoft 365 admin center, you can view and modify a user’s licenses on the Licenses and apps tab of their profile.

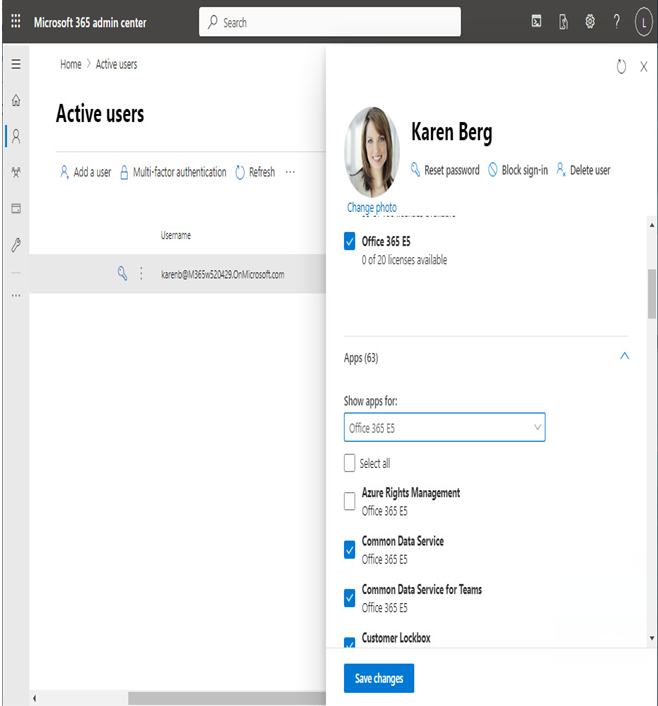
Figure 5.23 – User license management

As you can see in Figure 5.23, the user has the Office 365 E5 licensing plan enabled as well as individual services such as Common Data Service, Common Data Service for Teams, and Customer Lockbox, while the Azure Rights Management service plan for this licensing plan is disabled.

More Details
Jun 11, 2024
The Azure AD portal– Planning and Managing Azure AD Identities

The Azure AD portal is the other interface that is used to create and manage groups. As with the user creation options, the Azure AD portal provides a slimmed-down feel without the wizard experience of the Microsoft 365 admin center.
To create and manage groups in the Azure AD portal, follow these steps:

  1. Navigate to the Azure AD portal (https://aad.portal.azure.com) and select Groups.
  2. With the default All groups navigation item selected, click New group.

Figure 5.15 – Azure AD all groups

  1. On the New Group page, specify either Security or Microsoft 365 for Group type, enter a name in the Group name field, and optionally, provide a description in the Group description field. If you’ve selected Microsoft 365 as the group type, you will also be required to enter Group email address. The security groups created in the Azure portal are not mail-enabled.

Figure 5.16 – New Group page

  1. You can choose whether or not Azure AD security roles can be assigned to the group. If you select Yes, then the group must have an assigned membership.
  2. Under Membership type, you can select Assigned, Dynamic User, or Dynamic Device (if it is a security group). If it is a Microsoft 365 group, you can choose from Assigned or Dynamic user. Security groups with assigned membership can have all supported object types, but dynamic groups are constrained to a single object type.

Figure 5.17 – Creating a new dynamic group

  1. If you select a group with an Assigned membership type, you can add Owners and Members. If you select a group with either of the dynamic membership types, you must add a dynamic query, as shown in Figure 5.17.
  2. To configure a dynamic query, click Add dynamic query.
  3. On the Configure Rules tab of the Dynamic membership rules page, configure an expression that represents the users or devices you want to have included in the group. For example, to create a user membership rule that looks for the value Engineering in either the jobTitle or department user attributes, select the appropriate property, select Equals or Contains under Operator, and then enter the value Engineering.

Figure 5.18 – Creating a dynamic membership rule

  1. You can view the construction of the rule in the Rule syntax output box. If necessary, you can edit the rule free-form to create a more complex rule type.
  2. You can select the Validate Rules (Preview) tab and add users you think should be in-scope or out-of-scope to verify that the rule is working correctly. Click Add users and then select users from the picker. In this example, Aamir E Cupp and Abagael R Rauch were selected. Aamir’s job title is Manager and his department is Sales, so the expected result is that he is not included in the group. Abagael’s job title is Scientist but her department is Engineering. Based on the way the query is constructed, she is included in the group. See Figure 5.19.

Figure 5.19 – Validating the dynamic membership rule

  1. When you have finished editing the rule, click Save.
  2. Click Create to create the new group.
    Using the Azure AD portal, you can also update the membership rules for existing groups or change a group’s membership from Assigned to Dynamic by selecting the group and then editing the details in its Properties menu, as shown in Figure 5.20.

Figure 5.20 – Editing a group
If you change a group from Assigned to Dynamic membership, you’ll need to create a query. It’s important to note, though, that you cannot change a group’s type (for example, from Security to Microsoft 365) or whether a group is eligible for Azure AD role assignment—those options can only be selected when creating a group.
NOTE
Microsoft Entra is the new umbrella product that covers Microsoft identity management and governance. Currently, the Microsoft Entra admin center (https://entra.microsoft.com) maps to specific blades or tabs inside the Azure portal and doesn’t really display anything new. Over the next year or two, anticipate that Microsoft will begin emphasizing the Entra admin center experience over the Azure portal experience for identity management tasks.

Figure 5.21 – Entra admin center

More Details
Jan 23, 2024
Creating and managing cloud users– Planning and Managing Azure AD Identities

From an Azure AD perspective, cloud users are the easiest type of object to understand and manage. When you create an Azure AD or Microsoft 365 tenant, one of the first things you set up is your administrator user identity (in the form of [email protected]). This identity is stored in the Azure AD directory partition for your Microsoft 365 tenant. When we talk about Azure AD cloud users, we’re talking about users whose primary source of identity is in Azure AD.

Exam tip

Cloud users can be assigned to any domain that is verified in the Microsoft 365 tenant with a single caveat—the domain must be in managed mode. If a domain has been federated (such as with AD FS or PingFederate), users can only be assigned that domain when they are provisioned in the on-premises system.

The initial domain (or tenant domain) will always be a cloud-only domain since Azure AD will always be the source of authority for it. When you add domains to a tenant, the domains are initially configured as managed—that is, Azure AD is used to manage the identity store.

One benefit of configuring cloud-only users is that there is no dependency on any other infrastructure or identity service. For many small organizations, cloud-only identity is the perfect solution because it requires no hardware or software investment other than a Microsoft 365 subscription. Correspondingly, a drawback of cloud-only users is the lack of integration with on-premises directory solutions.

Exam tip

As a best practice, Microsoft recommends maintaining at least one cloud-only account in case you lose access to any on-premises environment.

The easiest way to provision cloud users is through the Microsoft 365 admin center (https://admin.microsoft.com). To configure a user, expand Users, select Active Users, and then click Add a user. The wizard, shown in Figure 5.1, will prompt you to configure an account.

Figure 5.1 – Adding a new cloud user

You can configure the name properties for a user as well as assign them any licenses and a location through the Add a user wizard’s workflow, as shown in Figure 5.2:

Figure 5.2 – Assign product licenses page

On the Optional settings page, you can also configure additional properties such as security roles, job title and department, addresses, and phone numbers, as shown in Figure 5.3.

Figure 5.3 – Add a user profile information

You can also add users through the Azure AD portal (https://aad.portal.azure.com). The Azure AD portal is arranged much differently from the Microsoft 365 admin center, due largely to the number of different types of resources and services that can be managed there. There are several differences in managing users and objects between the two interfaces; the Microsoft 365 admin center is a much more menu-driven experience, prompting administrators to configure common options and features inside the provisioning workflow.

Once you’ve logged in to the Azure AD portal, select Users and then select New user. The interface, shown in Figure 5.4, offers the opportunity to populate similar fields to those in the admin center.

Figure 5.4 – Creating a user through the Azure AD portal

Most organizations that are using Azure from a cloud-only identity perspective will likely provision objects inside the Microsoft 365 admin center.

More Details
Dec 7, 2023
Creating and managing users– Planning and Managing Azure AD Identities

As you’ve seen throughout this book, identity is the foundation of Azure AD. Without it, people wouldn’t be able to access services. Azure AD identity covers a broad range of objects, including cloud-only accounts, synchronized accounts, and external accounts (as well as groups, devices, and contacts).

Each of these types of objects has a purpose, and one is generally more suited to a business case than another.

In this chapter, we’re going to look at the following topics, as they relate to the MS-100 exam objectives:

  • Creating and managing users
  • Creating and managing guest users
  • Creating and managing groups
  • Managing and monitoring Microsoft 365 license allocations
  • Performing bulk user management

By the end of this chapter, you should be comfortable articulating the differences between the different kinds of objects and familiar with methods for provisioning and managing them.

Let’s get started!

Creating and managing users

Creating and managing users is central to administrating an information system—whether that system is an application on a small network, an enterprise-scale directory, or a cloud service hosted by a SaaS provider. In any instance, identities are used by people, applications, and devices to authenticate and perform activities.

In the context of Azure AD, there are three core types of identity:

  • Cloud-based users
  • Synchronized users
  • Guest users

When planning out identity scenarios, it’s important to understand the benefits, features, drawbacks, or capabilities associated with each type of identity and authentication scheme—including ease of provisioning, integration with existing directory or security products, requirements for on-premises infrastructure, and network availability.

In this section, we’ll learn about managing each of these kinds of users.

More Details
Nov 14, 2023
Attribute mapping– Implementing and Managing Identity Synchronization with Azure AD

Another customization option available involves mapping attribute values between on-premises and cloud objects. As with Azure AD Connect, you can configure how cloud attributes are populated – whether it’s from a source attribute, a constant value, or some sort of expression.
Azure AD Connect cloud sync comes with a default attribute mapping flow, as shown in Figure 4.33:

Figure 4.33 – Azure AD Connect cloud sync attribute mappings
You can select an existing attribute to modify or create a new attribute flow. One of the basic configuration features for many attributes is to configure a default value (if the on-premises value is blank), allowing you to make certain that cloud attributes are populated with values.
In Figure 4.34, the Country attribute has been selected and updated with the default value, US. This ensures that if a user’s on-premises Country attribute is blank, the corresponding cloud attribute will be populated with a valid entry.

Figure 4.34 – Edit attribute mappings in Azure AD Connect cloud sync
Azure AD Connect cloud sync also features an expression builder, allowing you to create your own custom attribute flows.
Unlike Azure AD Connect, however, attribute mappings and expressions cannot be used to merge attributes from different domains or forests, nor does Azure AD Connect cloud sync support synchronization rules or attribute flow precedence. If you require that level of customization, you should deploy Azure AD Connect instead.
Once you have finished customizing the scoping filters and attribute flows, you can return to the Overview page and enable synchronization by selecting Review and enable.
Summary
In this chapter, you built on the skills from Chapter 3 and learned how to deploy identity synchronization and authentication solutions. You learned how to configure filtering for both Azure AD Connect and Azure AD Connect cloud sync, as well as deploy and manage the health agents for diagnostics and troubleshooting.
In the next chapter, we’ll learn how to manage identities, groups, and licensing.
Knowledge check
In this section, we’ll test your knowledge of some key elements from this chapter.
Questions

  1. When installing Azure AD Connect cloud sync, which two roles, rights, or permissions are necessary for the on-premises Active Directory environment? Each answer represents a complete solution.
    • Hybrid Identity Administrator
    • Server Administrator
    • Domain Administrator
    • Enterprise Administrator
  2. Azure AD Connect cloud sync supports group-based scoping filters.
    • True
    • False
  3. You are trying to install the agent for Azure Active Directory Health for sync. Where is it located?
    • In the Azure AD Health portal
    • In the Azure AD Connect installation package
    • In the Microsoft Download Center
    • In the Microsoft 365 admin center
  4. You have determined that you need to run the Azure AD Connect troubleshooting tool. Where do you launch it?
    • In the Azure portal
    • In the Azure AD Connect Health portal
    • In the Azure AD Connect configuration wizard
    • In the Azure AD Connect synchronization service
  5. You have deployed Azure AD Connect and want to prevent it from synchronizing an organizational unit with test objects. Where can you do this easily?
    • The Azure AD portal
    • The Microsoft 365 admin center
    • The Azure AD Synchronization Rules Editor
    • The Azure AD Connect configuration wizard
    Answers
    C: Domain Administrator and D: Enterprise Administrator
    A: True
    B: In the Azure AD Connect installation package
    C: The Azure AD Connect configuration wizard
    D: The Azure AD Connect configuration wizard
More Details
Oct 8, 2023
Configuring the provisioning service– Implementing and Managing Identity Synchronization with Azure AD

In order to complete the Azure AD Connect cloud sync deployment, you’ll need to set up a new configuration in the Azure portal:

  1. Navigate to the Azure portal (https://portal.azure.com) and select Active Directory | Azure AD Connect.
  2. Select Cloud sync from the navigation menu and then, on the Configurations tab, select New configuration.
  3. On the New cloud sync configuration page, select which domains you would like to synchronize to Azure AD. If desired, select the Enable password hash sync checkbox. The password hash sync checkbox on this page only enables the feature; it does not configure password hash sync as a sign-in method (see Figure 4.30).
    EXAM TIP
    Azure AD Connect cloud sync does not support using password hash sync for InetOrgPerson objects.

Figure 4.30 – Creating a new Azure AD Connect cloud sync configuration

  1. Scroll to the bottom of the page and click Create to complete the basic configuration.
    The Azure AD Connect cloud sync configuration has been completed, but it is not yet enabled and ready to start provisioning users. In the next series of steps, you can customize the service before fully enabling it.
    Customizing the provisioning service
    Like the on-premises Azure AD Connect service, Azure AD Connect cloud sync features the ability to perform scoping (including or excluding objects from synchronization) as well as attribute mapping.
    After creating a new configuration, you should be redirected to the properties of the configuration, as shown in Figure 4.31:

Figure 4.31 – The provisioning agent overview page
From this page, you can set up the scoping filters and attribute mappings to customize your environment. By default, Azure AD Connect cloud sync will include all objects in the connected forest and domains for synchronization.
Scoping filters
By selecting Scoping filters under Manage, you can configure what objects should be included for synchronization to Azure AD. You can specify a list of security groups or select organizational units, but not both (see Figure 4.32).

Figure 4.32 – Azure AD Connect cloud sync scoping filters
There are a few important caveats when using scoping filters with Azure AD Connect cloud sync:
• When using group-based scoping, nested objects beyond the first level will not be included in scope
• You can only include 59 separate OUs or security groups as scoping filters
It’s also important to note that using security groups to perform scoping is only recommended for piloting scenarios.

More Details
Sep 22, 2023
Installing the provisioning agent– Implementing and Managing Identity Synchronization with Azure AD

To begin installing Azure AD Connect cloud sync, follow these steps:

  1. Log on to a server where you wish to install the Azure AD Connect cloud sync provisioning agent.
  2. Navigate to the Azure portal (https://portal.azure.com) and select Active Directory | Azure AD Connect.

Figure 4.25 – Azure AD Connect in the Azure portal

  1. From the navigation menu, select Cloud sync.
  2. Under Monitor, select Agents.
  3. Select Download on-premises agent.

Figure 4.26 – Download on-premises agent for Azure AD Connect cloud sync

  1. On the Azure AD Provisioning Agent flyout, select Accept terms & download to begin the download.
  2. Open the AADConnectProvisioningAgentSetup.exe file to begin the installation.
  3. Agree to the licensing terms and click Install to deploy the Microsoft Azure AD Connect provisioning package.
  4. After the software installation is complete, the configuration wizard will launch. Click Next on the splash page to begin the configuration.
  5. On the Select Extension page, choose the HR-driven provisioning (Workday and SuccessFactors) / Azure AD Connect Cloud Sync radio button and click Next.

Figure 4.27 – The Azure AD Connect cloud sync Select Extension page

  1. On the Connect Azure AD page, click Authenticate to sign in to Azure AD.
  2. On the Configure Service Account page, select the Create gMSA radio button to instruct the setup process to provision a new gMSA in the format of DOMAIN\provAgentgMSA. Enter either a Domain Administrator or Enterprise Administrator credential and click Next.

Figure 4.28 – Configuring an Azure AD Connect cloud sync service account
CREATING A CUSTOM GMSA
You can also create a gMSA if desired. The custom service account will need to be delegated permissions to read all properties on all User, inetOrgPerson, computer, device, Group, foreignSecurityPrincipal, and Contact objects, as well as being able to create and delete user objects. For more information, see https://learn.microsoft.com/en-us/azure/active-directory/cloud-sync/how-to-prerequisites?tabs=public-cloud#custom-gmsa-account.

  1. On the Connect Active Directory page, click Add Directory and provide the domain credentials to add the directory to the configuration. When finished, click Next.

Figure 4.29 – Adding a directory to Azure AD Connect cloud sync

  1. Review the details on the Agent configuration page and click Confirm to deploy the provisioning agent. When finished, click Exit.

After the agent has been deployed, you will need to continue in the Azure AD portal.

More Details
Aug 15, 2023
Azure AD Connect Health for AD FS– Implementing and Managing Identity Synchronization with Azure AD

In addition to gathering and reporting information for your on-premises Active Directory and synchronization services, Azure AD Connect Health also supports AD FS.
To get the most out of Azure AD Connect Health for AD FS, you’ll need to enable auditing, which involves three steps:

  1. Ensure that the AD FS farm service account has been granted the Generate security audits right in the security policy (Local Policies | User Rights Assignment | Generate security audits).
  2. From an elevated command prompt, run the following command: auditpol.exe /set /subcategory:{0CCE9222-69AE-11D9-BED3-505054503030} /failure:enable /success:enable.
  3. On the AD FS primary farm server, open an elevated PowerShell prompt and run the following command: Set-AdfsProperties -AuditLevel Verbose.
    Then, you can deploy the agents to your servers.
    After deploying the agents to your federation and proxy servers, you will see information reported in the Azure AD Connect Health portal under Active Directory Federation Services, as shown in Figure 4.21:

Figure 4.21 – Azure AD Connect Health for AD FS
In addition to diagnostic information, the health services for AD FS can also provide usage analytics and performance monitoring, as well as failed logins and information regarding risky sign-ins.

Figure 4.22 – Azure AD Connect Health for AD FS
Azure AD Connect Health is a valuable premium service that can help keep you on top of the health and performance aspects of your hybrid identity deployment.
Troubleshooting Azure AD Connect synchronization
While things normally operate smoothly, there may be times when objects become misconfigured or services go offline unexpectedly. You can troubleshoot common issues with Azure AD Connect’s built-in troubleshooting tools.
To launch the troubleshooting tool, follow these steps:

  1. Launch the Azure AD Connect configuration tool on the desktop of the server where Azure AD Connect is installed.
  2. Click Configure.
  3. On the Additional tasks page, select Troubleshoot and then click Next.
  4. On the Welcome to AADConnect Troubleshooting page, select Launch.

Figure 4.23 – Launching the AADConnect Troubleshooting tool

  1. Select the appropriate troubleshooting options from the menu shown in Figure 4.24:

Figure 4.24 – The AADConnect Troubleshooting menu
The AADConnect Troubleshooting tool provides several specific troubleshooters, such as diagnosing attribute or group membership synchronization, password hash synchronization, as well as service account permissions.
Most object or attribute troubleshooting routines will require the object’s DN to continue.
FURTHER READING
For more information on the tests that can be performed by the AADConnect Troubleshooting tool, see https://learn.microsoft.com/en-us/azure/active-directory/hybrid/tshoot-connect-objectsync.
Configuring and managing directory synchronization by using Azure AD Connect cloud sync
Azure AD Connect cloud sync is a new synchronization platform that allows you to manage directory synchronization from the Azure portal. Depending on your organization’s goals and environments, Azure AD Connect cloud sync can be a lightweight, flexible option that allows you to begin directory synchronization quickly.
EXAM TIP
To perform the installation, you’ll need either a Domain Administrator or Enterprise Administrator credential to the on-premises Active Directory forest so that the installer can create the group Managed Service Account (gMSA). You’ll also need an account that has either the Global Administrator or Hybrid Identity Administrator role in Azure AD.
Microsoft recommends configuring a unique identity in Azure AD with the Hybrid Identity Administrator role for Azure AD Connect cloud sync.

More Details
Mar 15, 2023
Configuring Azure AD Connect filters– Implementing and Managing Identity Synchronization with Azure AD

If you need to exclude objects from Azure AD Connect’s synchronization scope, you can do so through a number of different methods:
• Domain and organizational unit-based filtering
• Group-based filtering
• Attribute-based filtering
Let’s quickly examine these.


Domain and organizational unit-based filtering
With this method, you can deselect large portions of your directory by modifying the list of domains or organizational units that are selected for synchronization. While there are several ways to do this, the easiest way is through the Azure AD Connect setup and configuration tool:

  1. To launch the Azure AD Connect configuration tool, double-click the Azure AD Connect icon on the desktop of the server where Azure AD Connect is installed. After it launches, click Configure.
  2. On the Additional tasks page, select Customize synchronization options and then click Next.

Figure 4.8 – The Additional tasks page

  1. On the Connect to Azure AD page, enter a credential with either the Global Administrator or Hybrid Identity Administrator role and click Next.
  2. On the Connect your directories page, click Next.
  3. On the Domain and OU filtering page, select the Sync selected domains and OUs radio button, and then select or clear objects to include or exclude from synchronization.

Figure 4.9 – The Azure AD Connect Domain and OU filtering page

  1. Click Next.
  2. On the Optional features page, click Next.
  3. On the Ready to configure page, click Configure.
    After synchronization completes, verify that only objects from in-scope organizational units or domains are present in Azure AD.
    Group-based filtering
    Azure AD Connect only supports the configuration of group-based filtering if you choose to customize the Azure AD Connect setup. It is not available if you perform an express installation.
    That being said, if you’ve chosen a custom installation, you can choose to limit the synchronization scope to a single group. On the Filter users and devices page of the configuration wizard, select the Synchronize selected radio button and then enter the name or distinguished name (DN) of a group that contains the users and devices to be synchronized.

Figure 4.10 – The Filter users and devices page
With group-based filtering, only direct members of the group are synchronized. Users, groups, contacts, or devices nested inside other groups are not resolved or synchronized.
Microsoft recommends group-based filtering for piloting purposes only.

More Details
Feb 7, 2023
Attribute-based filtering– Implementing and Managing Identity Synchronization with Azure AD

Another way to filter objects to Azure AD is through the use of an attribute filter. This advanced method requires creating a custom synchronization rule in the Azure AD Connect Synchronization Rules Editor.
To create an attribute-based filtering rule, select an attribute that isn’t currently being used by your organization for another purpose. You can use this attribute as a scoping filter to exclude objects.
The following procedure can be used to create a simple filtering rule:

  1. On the server running Azure AD Connect, launch the Synchronization Rules Editor.
  2. Under Direction, select Inbound, and then click Add new rule.

Figure 4.11 – Synchronization Rules Editor

  1. Provide a name and a description for the rule.
  2. Under Connected System, select the object that represents your on-premises Active Directory forest.
  3. Under Connected System Object Type, select user.
  4. Under Metaverse Object Type, select person.
  5. Under Link Type, select Join.
  6. In the Precedence text field, enter an unused number (such as 50). Click Next.

Figure 4.12 – Creating a new inbound synchronization rule

  1. On the Scoping filter page, click Add group and then click Add clause.
  2. Under Attribute, select extensionAttribute1 (or whichever unused attribute you have selected).
  3. Under Operator, select EQUAL.
  4. In the Value text field, enter NOSYNC and then click Next.

Figure 4.13 – Configuring a scoping filter for extensionAttribute1

  1. On the Join rules page, click Next without adding any parameters.
  2. On the Transformations page, click Add transformation.
  3. Under FlowType, select Constant.
  4. Under Target Attribute, select cloudFiltered.
  5. In the Source text field, enter the value True. Click Add transformation.

Figure 4.14 – Adding a transformation for the cloudFiltered attribute

  1. Acknowledge the warning that a full import will be required by clicking OK.

Figure 4.15 – The warning for full import and synchronization
After modifying a synchronization rule, a full import and full synchronization is required. You don’t have to perform any special steps, however; Azure AD Connect is aware of the update and will automatically perform the necessary full imports and synchronizations.
Monitoring synchronization by using Azure AD Connect Health
Azure AD Connect Health is a premium feature of the Azure AD license. Azure AD Connect Health has separate agent features for Azure AD Connect, Azure AD Health for Directory Services, and Azure AD Health for Active Directory Federation Services (AD FS).

More Details