Dec 7, 2023
Creating and managing users– Planning and Managing Azure AD Identities

As you’ve seen throughout this book, identity is the foundation of Azure AD. Without it, people wouldn’t be able to access services. Azure AD identity covers a broad range of objects, including cloud-only accounts, synchronized accounts, and external accounts (as well as groups, devices, and contacts).

Each of these types of objects has a purpose, and one is generally more suited to a business case than another.

In this chapter, we’re going to look at the following topics, as they relate to the MS-100 exam objectives:

  • Creating and managing users
  • Creating and managing guest users
  • Creating and managing groups
  • Managing and monitoring Microsoft 365 license allocations
  • Performing bulk user management

By the end of this chapter, you should be comfortable articulating the differences between the different kinds of objects and familiar with methods for provisioning and managing them.

Let’s get started!

Creating and managing users

Creating and managing users is central to administrating an information system—whether that system is an application on a small network, an enterprise-scale directory, or a cloud service hosted by a SaaS provider. In any instance, identities are used by people, applications, and devices to authenticate and perform activities.

In the context of Azure AD, there are three core types of identity:

  • Cloud-based users
  • Synchronized users
  • Guest users

When planning out identity scenarios, it’s important to understand the benefits, features, drawbacks, or capabilities associated with each type of identity and authentication scheme—including ease of provisioning, integration with existing directory or security products, requirements for on-premises infrastructure, and network availability.

In this section, we’ll learn about managing each of these kinds of users.

More Details
Nov 14, 2023
Attribute mapping– Implementing and Managing Identity Synchronization with Azure AD

Another customization option available involves mapping attribute values between on-premises and cloud objects. As with Azure AD Connect, you can configure how cloud attributes are populated – whether it’s from a source attribute, a constant value, or some sort of expression.
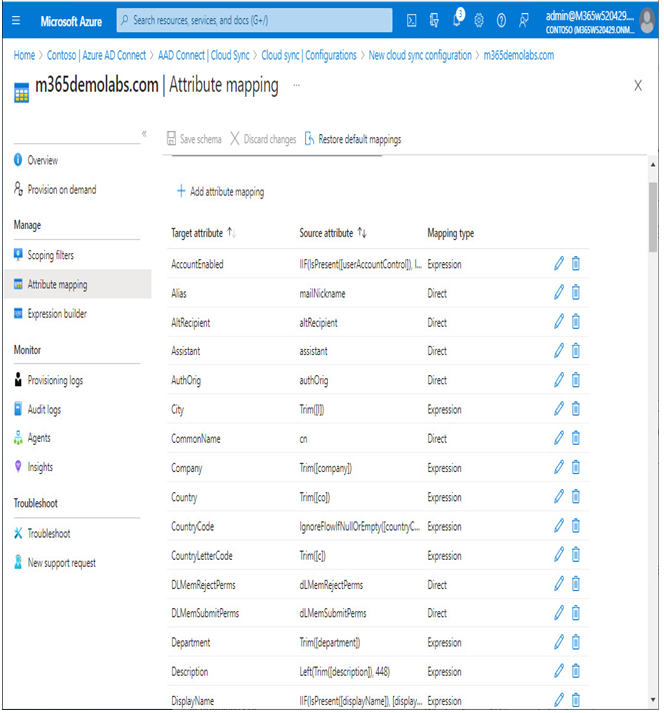
Azure AD Connect cloud sync comes with a default attribute mapping flow, as shown in Figure 4.33:

Figure 4.33 – Azure AD Connect cloud sync attribute mappings
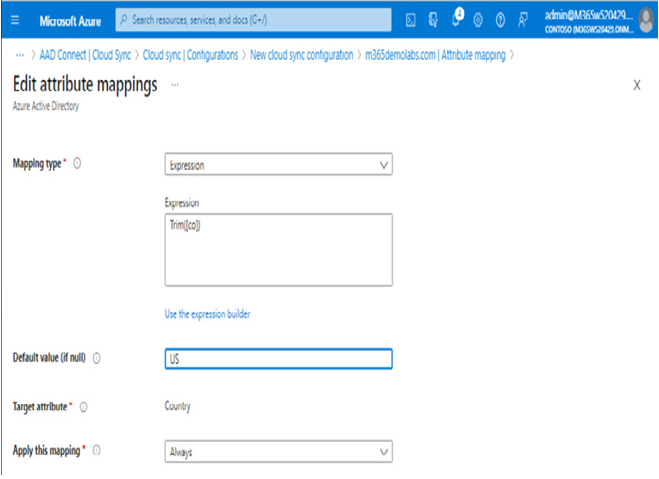
You can select an existing attribute to modify or create a new attribute flow. One of the basic configuration features for many attributes is to configure a default value (if the on-premises value is blank), allowing you to make certain that cloud attributes are populated with values.
In Figure 4.34, the Country attribute has been selected and updated with the default value, US. This ensures that if a user’s on-premises Country attribute is blank, the corresponding cloud attribute will be populated with a valid entry.

Figure 4.34 – Edit attribute mappings in Azure AD Connect cloud sync
Azure AD Connect cloud sync also features an expression builder, allowing you to create your own custom attribute flows.
Unlike Azure AD Connect, however, attribute mappings and expressions cannot be used to merge attributes from different domains or forests, nor does Azure AD Connect cloud sync support synchronization rules or attribute flow precedence. If you require that level of customization, you should deploy Azure AD Connect instead.
Once you have finished customizing the scoping filters and attribute flows, you can return to the Overview page and enable synchronization by selecting Review and enable.
Summary
In this chapter, you built on the skills from Chapter 3 and learned how to deploy identity synchronization and authentication solutions. You learned how to configure filtering for both Azure AD Connect and Azure AD Connect cloud sync, as well as deploy and manage the health agents for diagnostics and troubleshooting.
In the next chapter, we’ll learn how to manage identities, groups, and licensing.
Knowledge check
In this section, we’ll test your knowledge of some key elements from this chapter.
Questions

  1. When installing Azure AD Connect cloud sync, which two roles, rights, or permissions are necessary for the on-premises Active Directory environment? Each answer represents a complete solution.
    • Hybrid Identity Administrator
    • Server Administrator
    • Domain Administrator
    • Enterprise Administrator
  2. Azure AD Connect cloud sync supports group-based scoping filters.
    • True
    • False
  3. You are trying to install the agent for Azure Active Directory Health for sync. Where is it located?
    • In the Azure AD Health portal
    • In the Azure AD Connect installation package
    • In the Microsoft Download Center
    • In the Microsoft 365 admin center
  4. You have determined that you need to run the Azure AD Connect troubleshooting tool. Where do you launch it?
    • In the Azure portal
    • In the Azure AD Connect Health portal
    • In the Azure AD Connect configuration wizard
    • In the Azure AD Connect synchronization service
  5. You have deployed Azure AD Connect and want to prevent it from synchronizing an organizational unit with test objects. Where can you do this easily?
    • The Azure AD portal
    • The Microsoft 365 admin center
    • The Azure AD Synchronization Rules Editor
    • The Azure AD Connect configuration wizard
    Answers
    C: Domain Administrator and D: Enterprise Administrator
    A: True
    B: In the Azure AD Connect installation package
    C: The Azure AD Connect configuration wizard
    D: The Azure AD Connect configuration wizard
More Details
Oct 8, 2023
Configuring the provisioning service– Implementing and Managing Identity Synchronization with Azure AD

In order to complete the Azure AD Connect cloud sync deployment, you’ll need to set up a new configuration in the Azure portal:

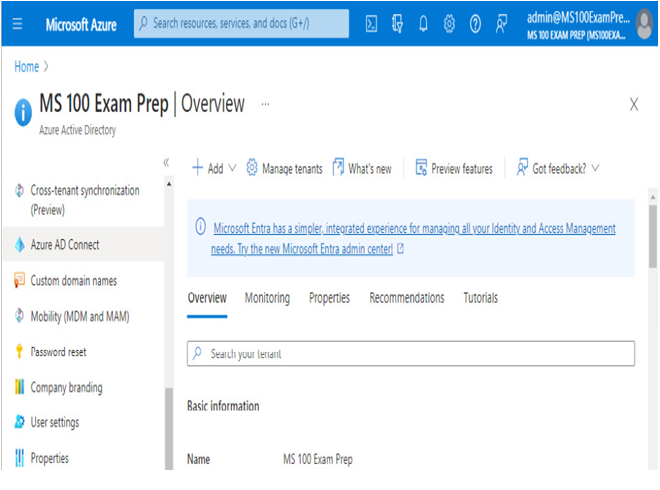
  1. Navigate to the Azure portal (https://portal.azure.com) and select Active Directory | Azure AD Connect.
  2. Select Cloud sync from the navigation menu and then, on the Configurations tab, select New configuration.
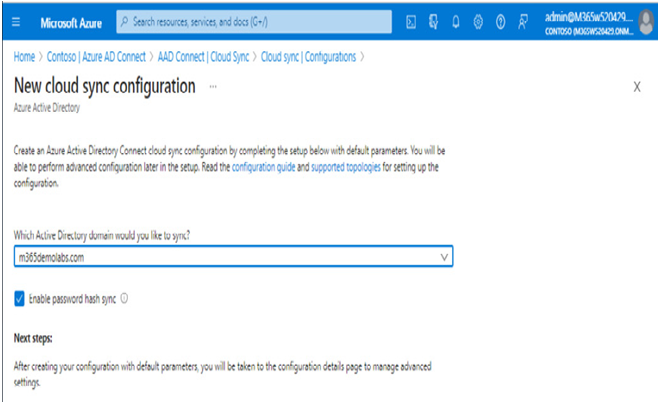
  3. On the New cloud sync configuration page, select which domains you would like to synchronize to Azure AD. If desired, select the Enable password hash sync checkbox. The password hash sync checkbox on this page only enables the feature; it does not configure password hash sync as a sign-in method (see Figure 4.30).
    EXAM TIP
    Azure AD Connect cloud sync does not support using password hash sync for InetOrgPerson objects.

Figure 4.30 – Creating a new Azure AD Connect cloud sync configuration

  1. Scroll to the bottom of the page and click Create to complete the basic configuration.
    The Azure AD Connect cloud sync configuration has been completed, but it is not yet enabled and ready to start provisioning users. In the next series of steps, you can customize the service before fully enabling it.
    Customizing the provisioning service
    Like the on-premises Azure AD Connect service, Azure AD Connect cloud sync features the ability to perform scoping (including or excluding objects from synchronization) as well as attribute mapping.
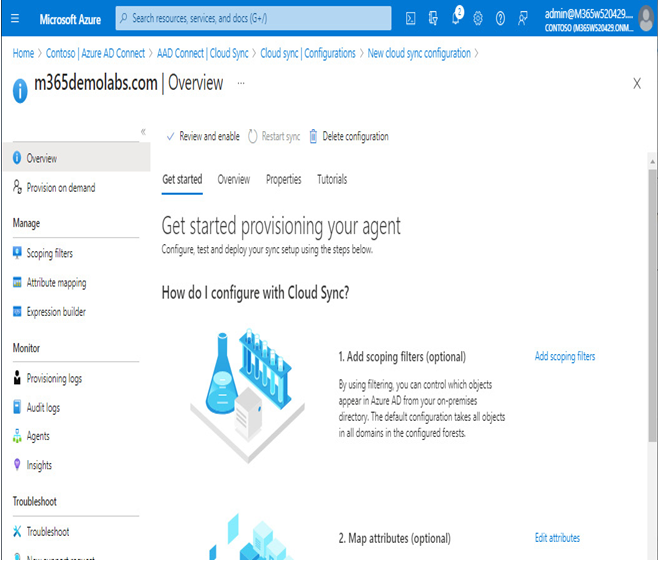
    After creating a new configuration, you should be redirected to the properties of the configuration, as shown in Figure 4.31:

Figure 4.31 – The provisioning agent overview page
From this page, you can set up the scoping filters and attribute mappings to customize your environment. By default, Azure AD Connect cloud sync will include all objects in the connected forest and domains for synchronization.
Scoping filters
By selecting Scoping filters under Manage, you can configure what objects should be included for synchronization to Azure AD. You can specify a list of security groups or select organizational units, but not both (see Figure 4.32).

Figure 4.32 – Azure AD Connect cloud sync scoping filters
There are a few important caveats when using scoping filters with Azure AD Connect cloud sync:
• When using group-based scoping, nested objects beyond the first level will not be included in scope
• You can only include 59 separate OUs or security groups as scoping filters
It’s also important to note that using security groups to perform scoping is only recommended for piloting scenarios.

More Details
Sep 22, 2023
Installing the provisioning agent– Implementing and Managing Identity Synchronization with Azure AD

To begin installing Azure AD Connect cloud sync, follow these steps:

  1. Log on to a server where you wish to install the Azure AD Connect cloud sync provisioning agent.
  2. Navigate to the Azure portal (https://portal.azure.com) and select Active Directory | Azure AD Connect.

Figure 4.25 – Azure AD Connect in the Azure portal

  1. From the navigation menu, select Cloud sync.
  2. Under Monitor, select Agents.
  3. Select Download on-premises agent.

Figure 4.26 – Download on-premises agent for Azure AD Connect cloud sync

  1. On the Azure AD Provisioning Agent flyout, select Accept terms & download to begin the download.
  2. Open the AADConnectProvisioningAgentSetup.exe file to begin the installation.
  3. Agree to the licensing terms and click Install to deploy the Microsoft Azure AD Connect provisioning package.
  4. After the software installation is complete, the configuration wizard will launch. Click Next on the splash page to begin the configuration.
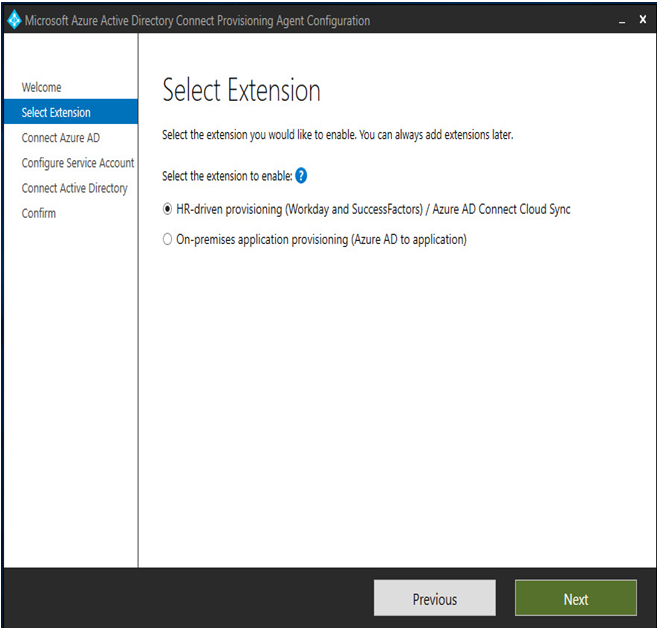
  5. On the Select Extension page, choose the HR-driven provisioning (Workday and SuccessFactors) / Azure AD Connect Cloud Sync radio button and click Next.

Figure 4.27 – The Azure AD Connect cloud sync Select Extension page

  1. On the Connect Azure AD page, click Authenticate to sign in to Azure AD.
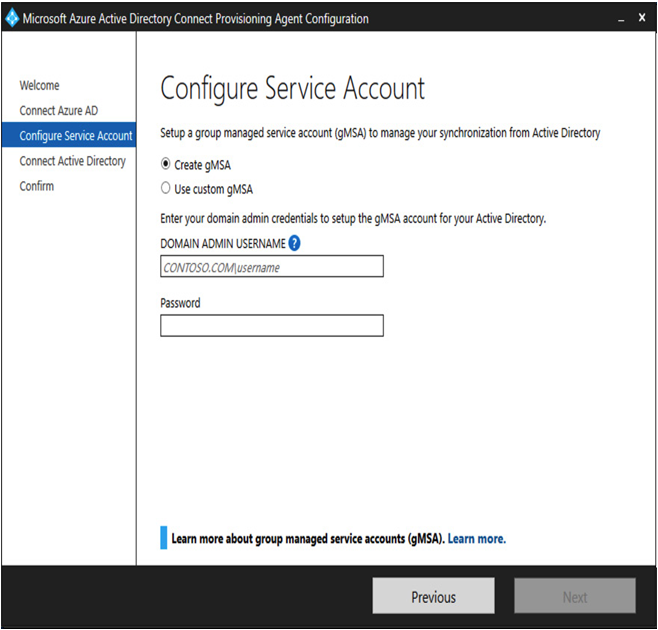
  2. On the Configure Service Account page, select the Create gMSA radio button to instruct the setup process to provision a new gMSA in the format of DOMAIN\provAgentgMSA. Enter either a Domain Administrator or Enterprise Administrator credential and click Next.

Figure 4.28 – Configuring an Azure AD Connect cloud sync service account
CREATING A CUSTOM GMSA
You can also create a gMSA if desired. The custom service account will need to be delegated permissions to read all properties on all User, inetOrgPerson, computer, device, Group, foreignSecurityPrincipal, and Contact objects, as well as being able to create and delete user objects. For more information, see https://learn.microsoft.com/en-us/azure/active-directory/cloud-sync/how-to-prerequisites?tabs=public-cloud#custom-gmsa-account.

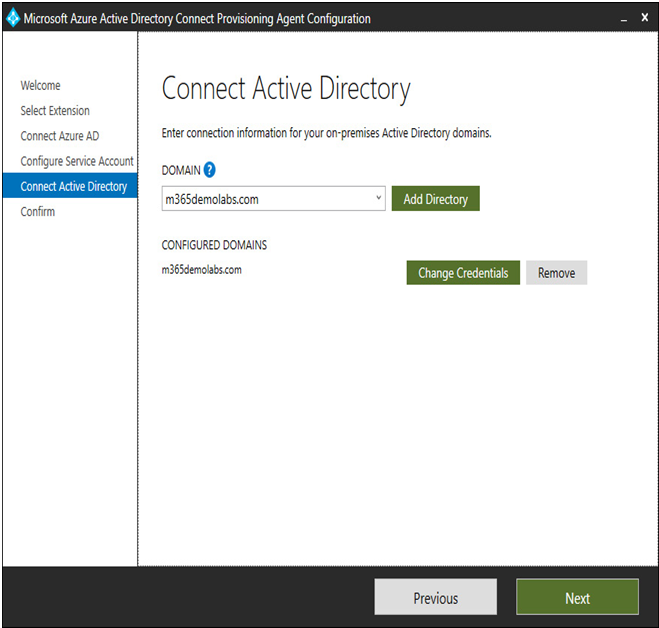
  1. On the Connect Active Directory page, click Add Directory and provide the domain credentials to add the directory to the configuration. When finished, click Next.

Figure 4.29 – Adding a directory to Azure AD Connect cloud sync

  1. Review the details on the Agent configuration page and click Confirm to deploy the provisioning agent. When finished, click Exit.

After the agent has been deployed, you will need to continue in the Azure AD portal.

More Details
Aug 15, 2023
Azure AD Connect Health for AD FS– Implementing and Managing Identity Synchronization with Azure AD

In addition to gathering and reporting information for your on-premises Active Directory and synchronization services, Azure AD Connect Health also supports AD FS.
To get the most out of Azure AD Connect Health for AD FS, you’ll need to enable auditing, which involves three steps:

  1. Ensure that the AD FS farm service account has been granted the Generate security audits right in the security policy (Local Policies | User Rights Assignment | Generate security audits).
  2. From an elevated command prompt, run the following command: auditpol.exe /set /subcategory:{0CCE9222-69AE-11D9-BED3-505054503030} /failure:enable /success:enable.
  3. On the AD FS primary farm server, open an elevated PowerShell prompt and run the following command: Set-AdfsProperties -AuditLevel Verbose.
    Then, you can deploy the agents to your servers.
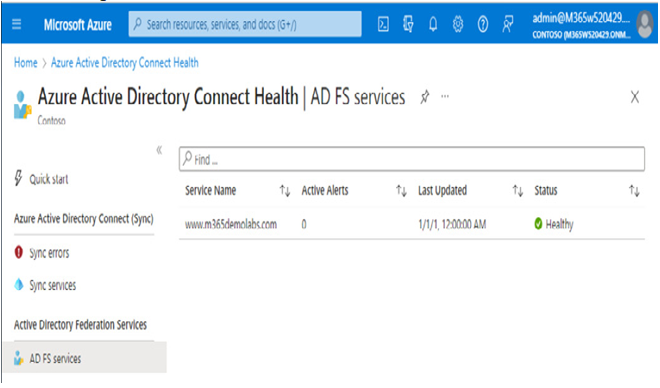
    After deploying the agents to your federation and proxy servers, you will see information reported in the Azure AD Connect Health portal under Active Directory Federation Services, as shown in Figure 4.21:

Figure 4.21 – Azure AD Connect Health for AD FS
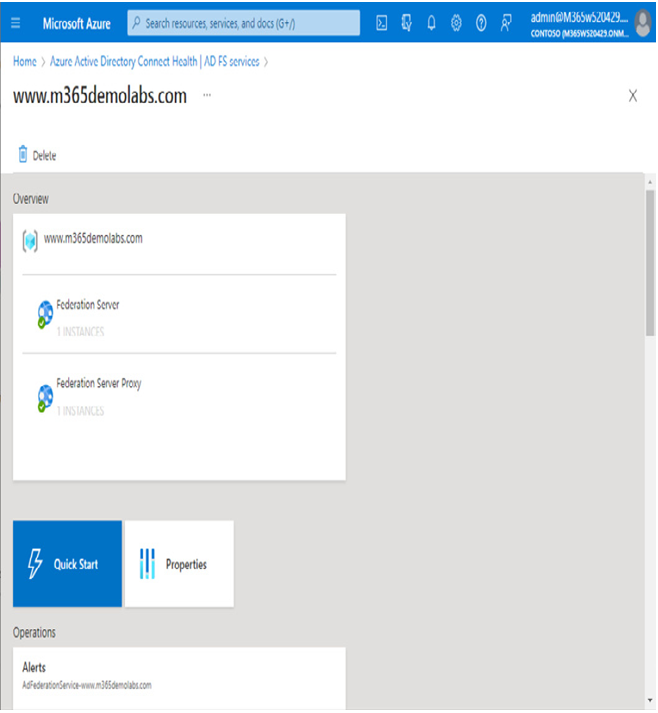
In addition to diagnostic information, the health services for AD FS can also provide usage analytics and performance monitoring, as well as failed logins and information regarding risky sign-ins.

Figure 4.22 – Azure AD Connect Health for AD FS
Azure AD Connect Health is a valuable premium service that can help keep you on top of the health and performance aspects of your hybrid identity deployment.
Troubleshooting Azure AD Connect synchronization
While things normally operate smoothly, there may be times when objects become misconfigured or services go offline unexpectedly. You can troubleshoot common issues with Azure AD Connect’s built-in troubleshooting tools.
To launch the troubleshooting tool, follow these steps:

  1. Launch the Azure AD Connect configuration tool on the desktop of the server where Azure AD Connect is installed.
  2. Click Configure.
  3. On the Additional tasks page, select Troubleshoot and then click Next.
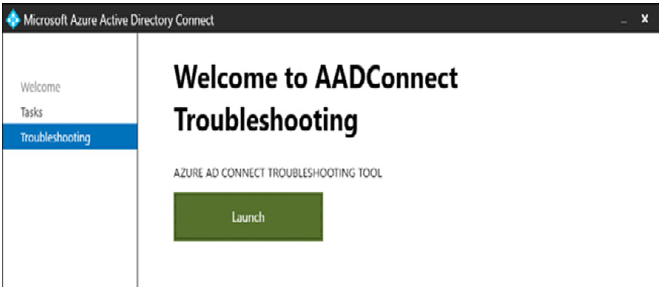
  4. On the Welcome to AADConnect Troubleshooting page, select Launch.

Figure 4.23 – Launching the AADConnect Troubleshooting tool

  1. Select the appropriate troubleshooting options from the menu shown in Figure 4.24:

Figure 4.24 – The AADConnect Troubleshooting menu
The AADConnect Troubleshooting tool provides several specific troubleshooters, such as diagnosing attribute or group membership synchronization, password hash synchronization, as well as service account permissions.
Most object or attribute troubleshooting routines will require the object’s DN to continue.
FURTHER READING
For more information on the tests that can be performed by the AADConnect Troubleshooting tool, see https://learn.microsoft.com/en-us/azure/active-directory/hybrid/tshoot-connect-objectsync.
Configuring and managing directory synchronization by using Azure AD Connect cloud sync
Azure AD Connect cloud sync is a new synchronization platform that allows you to manage directory synchronization from the Azure portal. Depending on your organization’s goals and environments, Azure AD Connect cloud sync can be a lightweight, flexible option that allows you to begin directory synchronization quickly.
EXAM TIP
To perform the installation, you’ll need either a Domain Administrator or Enterprise Administrator credential to the on-premises Active Directory forest so that the installer can create the group Managed Service Account (gMSA). You’ll also need an account that has either the Global Administrator or Hybrid Identity Administrator role in Azure AD.
Microsoft recommends configuring a unique identity in Azure AD with the Hybrid Identity Administrator role for Azure AD Connect cloud sync.

More Details
Jul 24, 2023
Password hash synchronization– Planning Identity Synchronization

Password hash synchronization (commonly referred to as PHS) is the Microsoft-recommended identity solution. In addition to synchronizing the core identity object data, PHS also synchronizes password hash values to the account objects in Azure AD. This ensures that users can use the same password to access local Active Directory resources, as well as Azure AD services.

Further reading

The security behind Azure AD Password Hash Synchronization is complex, involving multiple hashing algorithms. For a deeper understanding of how Password Hash Synchronization protects user data, see https://learn.microsoft.com/en-us/azure/active-directory/hybrid/how-to-connect-password-hash-synchronization.

When a user logs in to a tenant that has PHS configured, every part of the authentication takes place in Azure AD. This is advantageous because the organization has no reliance on the availability of any on-premises infrastructure for ongoing authentication. Once an identity and its password hash have been synchronized, the on-premises directory isn’t needed until the on-premises object is updated again (such as an additional email address, a change in the display name, or a new password).

In addition, PHS enables an advanced Azure AD Premium P2 security feature: leaked credential detection. With this feature, Microsoft continuously checks various dark websites for organizational identity data that may have been compromised.

As mentioned in the Accounts and security section, password hash synchronization requires the service account to have the Replicating Directory Changes and Replicating Directory Changes All rights in the on-premises directory.

Password hash synchronization is a cloud authentication solution.

Pass-through authentication

Similar to password hash synchronization, pass-through authentication (PTA) relies on synchronizing objects to Azure AD. Unlike PHS, however, the actual password validation happens on-premises. PTA relies upon an agent installed on-premises, which periodically checks Azure for an authentication request.

When Azure AD Connect is configured with PTA, a secure channel is established between the Azure Service Bus and the lightweight PTA agent. For redundancy, you can deploy multiple PTA agents in your environment.

Note

From a networking perspective, Azure AD Connect’s communication is outbound only to the Azure Service Bus. Unlike federation, PTA does not require inbound connectivity.

When a user requests access to an Azure AD resource, the logon request is stored on the Azure Service Bus. This request is encrypted with the public key of each of the PTA agents. The agents check the Service Bus for a request, bring the request back on-premises, decrypt it with the agent’s private key, and then process the request against an on-premises domain controller. The result of the validation (either success or failure) is then sent back to the Azure Service Bus, where Azure AD retrieves the response and then either grants or denies the logon request.

PTA is a potential solution for organizations that want as much benefit from cloud authentication as possible but may have organizational requirements for on-premises credential validation or the enforcement of Active Directory logon hours.

Due to its on-premises password validation component, if none of the on-premises authentication agents can connect to both the Azure Service Bus and local Active Directory, users will be unable to log in.

Microsoft categorized PTA as a cloud authentication solution.

More Details
Jun 4, 2023
Federation– Planning Identity Synchronization

With federated identity solutions, Azure AD is configured to refer authentication requests to an on-premises service to validate login data. When a federated user attempts to log on to an Azure AD resource, Azure AD redirects the login session to an organization-managed web service. Users then enter their credentials in this organization-managed application, which, in turn, validates the logon details against the on-premises directory.

Some organizations may require federated identity due to specific regulations, the need to use smartcard-based login, or third-party multi-factor authentication products. Due to its on-premises password validation component, if on-premises services (such as federation farm servers, load balancers, web application proxy servers, or domain controllers) are unavailable, users will be unable to log in to Azure AD.

You can use the following flowchart to understand which solution is appropriate for you:

`

Figure 3.6 – Authentication selection decision flowchart

Once you have selected an identity and authentication mechanism for your tenant, you can begin preparing your environment for hybrid authentication. Regardless of the method selected for authenticating hybrid identity, Azure AD Connect can be used to configure it.

Summary

In this chapter, you learned how to plan for a hybrid identity deployment, including choosing an authentication method (such as password hash sync, pass-through authentication, or federation) and understanding the various requirements and capabilities of identity synchronization tools. You also learned the basic terminology associated with the Azure AD Connect synchronization engine.

In the next chapter, we will begin configuring Azure AD Connect.

Knowledge check

In this section, we’ll test your knowledge of some key elements from this chapter.

Questions

Answer the following questions:

  1. Which two authentication or sign-in methods validate user passwords on-premises?
    • Password hash synchronization
    • Pass-through authentication
    • Federation
    • Hybrid identity
  1. Which two rights are necessary for password hash synchronization?
    • Replicating Directory Changes
    • Replicating Directory Changes Password
    • Replicating Directory Changes All
    • Replicating Directory Changes Advanced
  2. Which feature, service, or component is a consolidated view of all objects from the connected systems?
    • Connector space
    • sourceAnchor
    • Connected system
    • Metaverse
  3. You have 75,000 objects in your Active Directory environment and need to recommend a solution for Azure AD Connect. You should recommend the simplest option that supports your environment.
    • An Azure AD Connect server with local SQL Server Express
    • An Azure AD Connect server with local or remote SQL Server Analysis Services
    • Azure AD Connect with database stored in a local or remote standalone SQL server
    • Azure AD Connect configured with WID database
  4. Azure AD Connect setup can configure which two federation services?
    • Azure Active Directory Federation Services
    • Active Directory Federation Services
    • OKTA Federation Services
    • PingFederate

Answers

The following are the answers to this chapter’s questions:

  1. B: Pass-through authentication; C: Federation
  2. A: Replicating Directory Changes; C: Replicating Directory Changes All
  3. D: Metaverse
  4. A: Azure AD Connect with local SQL Server Express
  5. B: Active Directory Federation Services; D: PingFederate
More Details
May 22, 2023
Preparing for identity synchronization by using IdFix– Implementing and Managing Identity Synchronization with Azure AD

IdFix is Microsoft’s tool for detecting common issues with on-premises AD identity data. While it doesn’t fix all errors, it is able to identify and remediate data formatting errors so that objects have valid data to synchronize.
IdFix supports the following features:
• Transaction rollback
• Verbose logging
• Exporting data to the CSV and LDF formats for offline review and editing
To get started with the tool, follow these steps:

  1. Navigate to https://aka.ms/idfix.
  2. Scroll to the bottom of the page and click Next.
  3. Review the prerequisites for the tool. Scroll to the bottom of the page and click Next.
  4. Click setup.exe to download the file and start the installation.
  5. After the installation wizard starts, click Install.
  6. Acknowledge the IdFix privacy statement by clicking OK.
  7. IdFix, by default, targets the entire directory. You can select Settings (the gear icon) to change the options for IdFix. You can edit the filter to scope to certain object types. You can also select the search base to specify a starting point for IdFix to begin its query. After modifying any settings, click OK.

Figure 4.1 – The IdFix settings

  1. Click Query to connect to AD and begin the analysis.
    SCHEMA WARNING
    If you receive a schema warning, such as the one in Figure 4.2, you can click Yes to proceed or click No to return to the IdFix tool. The schema warning is generally presented when attributes are present in the AD schema but have not been marked for replication (usually because Exchange Server has not been installed or replication hasn’t completed successfully in your organization for an extended period of time). If you receive this error, you should check to ensure that you have at least run the Exchange Server setup with the /PrepareSchema and /PrepareAD switches and have validated that AD replication is working correctly.

Figure 4.2 – The IdFix schema warning
After IdFix has analyzed the environment, results are returned to the data grid, shown in Figure 4.3. The DISTINGUISHEDNAME column shows the full path to the object in question, while the ATTRIBUTE column shows the attribute or property impacted. The ERROR column shows what type of error was encountered (such as an invalid character or duplicate object value). The VALUE column shows the existing value and the UPDATE column shows any suggested value.

Figure 4.3 – The IdFix data grid
After you have investigated an object, you can choose to accept the suggested value in the UPDATE column (if one exists). You can also choose to either enter or edit a new value in the UPDATE column.
Once you’re done investigating or updating an object, you can use the dropdown in the ACTION column to mark an object:
• Selecting EDIT indicates that you want to configure the object attribute with the value in the UPDATE column
• Selecting COMPLETE indicates that you want to leave the object as is
• Selecting REMOVE instructs IdFix to clear the offending attribute
In addition, you can select Accept to accept any suggested values in the UPDATE column. Choosing this option will configure all objects with a value in the UPDATE column to EDIT, indicating that the changes are ready to be processed.
Once you have configured an action for each object, select Apply to instruct IdFix to make the changes.

  1. IdFix will process the changes. Transactions are written to a log that can be imported and used to roll back any mistakes.
  2. Once you have ensured that your on-premises directory data is ready to synchronize to Azure AD, you can deploy and configure one of the Azure AD Connect synchronization products.
More Details
Apr 9, 2023
Configuring and managing directory synchronization by using Azure AD Connect– Implementing and Managing Identity Synchronization with Azure AD

Azure AD Connect has a long history, originally starting as DirSync to support the deployment of Microsoft Business Productivity Online Suite (BPOS) in 2007.
If you are familiar with Microsoft Identity Manager (MIM), you’ll notice a lot of similarities between that and the current Azure AD Connect platform. As you learned in Chapter 3, Azure AD Connect allows you to connect to multiple directory sources and provision those objects to Azure AD.


Installing the synchronization service
The first step to deploying Azure AD Connect is gathering the requirements of your environment, as outlined in Chapter 3. These requirements can impact the prerequisites for deployment (such as additional memory or a standalone SQL Server environment). As part of the planning process, you’ll also want to identify which sign-in method will be employed (password hash synchronization, pass-through authentication, or federation).


EXAM TIP
To perform the express installation, you’ll need an Enterprise Administrator credential to the on-premises Active Directory forest so that the installer can create a service account and delegate the correct permissions. By default, the on-premises service account is created in the CN=Users container and named MSOL_.
You’ll also need an account that has either the Global Administrator or Hybrid Identity Administrator role in Azure AD, which Azure AD Connect will use to create a cloud synchronization service account. By default, the cloud service account is named Sync_.
With that information in hand, it’s time to start deploying Azure AD Connect:

  1. On the server where Azure AD Connect will be deployed, download the latest version of the Azure AD Connect setup files (https://aka.ms/aad-connect) and launch the installer.
  2. Agree to the installation terms and select Continue.

Figure 4.4 – The Azure AD Connect welcome page

  1. Review the Express Settings page. You can choose Customize if you want to configure Azure AD Connect to use the pass-through or federated authentication methods, group-based filtering, or a custom SQL Server installation. While the sign-in methods and other features can be changed after installation, it is not possible to enable group-based filtering or change the SQL Server location after setup.

Figure 4.5 – The Azure AD Connect Express Settings page
INSTALLATION NOTES
If you have other domains in your AD forest, they must all be reachable from the Azure AD Connect server or installation will fail. You can perform a custom installation to specify which domains to include in synchronization.

  1. On the Connect to Azure AD page, enter a credential that has either the Global Administrator or Hybrid Identity Administrator role in Azure AD. Click Next.
  2. On the Connect to AD DS page, enter an Enterprise Administrator credential and click Next.
  3. Verify the configuration settings. By default, the Exchange hybrid scenario is not enabled. If you have an on-premises Exchange environment that you will migrate to Microsoft 365, select the Exchange hybrid deployment option to include the Exchange-specific attributes. If you want to perform additional configuration tasks before synchronizing users, clear the Start the synchronization process when configuration completes. checkbox.

Figure 4.6 – The Azure AD Connect Ready to configure page

  1. Click Install.
  2. Review the Configuration complete page and click Exit.

Figure 4.7 – The Azure AD Connect Configuration complete page
If you selected the Start the synchronization process when configuration completes. checkbox, you can review the Azure AD portal to verify that users have been synchronized.

More Details
Mar 15, 2023
Configuring Azure AD Connect filters– Implementing and Managing Identity Synchronization with Azure AD

If you need to exclude objects from Azure AD Connect’s synchronization scope, you can do so through a number of different methods:
• Domain and organizational unit-based filtering
• Group-based filtering
• Attribute-based filtering
Let’s quickly examine these.


Domain and organizational unit-based filtering
With this method, you can deselect large portions of your directory by modifying the list of domains or organizational units that are selected for synchronization. While there are several ways to do this, the easiest way is through the Azure AD Connect setup and configuration tool:

  1. To launch the Azure AD Connect configuration tool, double-click the Azure AD Connect icon on the desktop of the server where Azure AD Connect is installed. After it launches, click Configure.
  2. On the Additional tasks page, select Customize synchronization options and then click Next.

Figure 4.8 – The Additional tasks page

  1. On the Connect to Azure AD page, enter a credential with either the Global Administrator or Hybrid Identity Administrator role and click Next.
  2. On the Connect your directories page, click Next.
  3. On the Domain and OU filtering page, select the Sync selected domains and OUs radio button, and then select or clear objects to include or exclude from synchronization.

Figure 4.9 – The Azure AD Connect Domain and OU filtering page

  1. Click Next.
  2. On the Optional features page, click Next.
  3. On the Ready to configure page, click Configure.
    After synchronization completes, verify that only objects from in-scope organizational units or domains are present in Azure AD.
    Group-based filtering
    Azure AD Connect only supports the configuration of group-based filtering if you choose to customize the Azure AD Connect setup. It is not available if you perform an express installation.
    That being said, if you’ve chosen a custom installation, you can choose to limit the synchronization scope to a single group. On the Filter users and devices page of the configuration wizard, select the Synchronize selected radio button and then enter the name or distinguished name (DN) of a group that contains the users and devices to be synchronized.

Figure 4.10 – The Filter users and devices page
With group-based filtering, only direct members of the group are synchronized. Users, groups, contacts, or devices nested inside other groups are not resolved or synchronized.
Microsoft recommends group-based filtering for piloting purposes only.

More Details